No experience needed. No installs on your own machine. Everything happens in your browser. Just follow along, step by step — if you get stuck, put your hand up, someone will come help.
What you'll leave with: a real, working AI agent that you built and customised yourself, running live in your browser.
What actually is an "agent"?
You've probably used a chatbot before (ChatGPT, Gemini, etc.). A chatbot talks. It answers questions using what it already knows, frozen at some point in the past.
An agent is different: it can act. It can check real, live information, run real calculations — and decide for itself when it needs to do that, instead of just guessing.
Today you'll build both, in the same agent, and watch it decide, live, when to just talk and when to actually go and do something.

- Go to shell.cloud.google.com
- Sign in with any Google account (your personal one is fine)
- Click Continue / Authorize on any prompts you see
- Wait ~30 seconds — Cloud Shell is spinning up a little computer just for you, in the browser
You now have a real terminal and code editor, with nothing installed on your own laptop. ✅
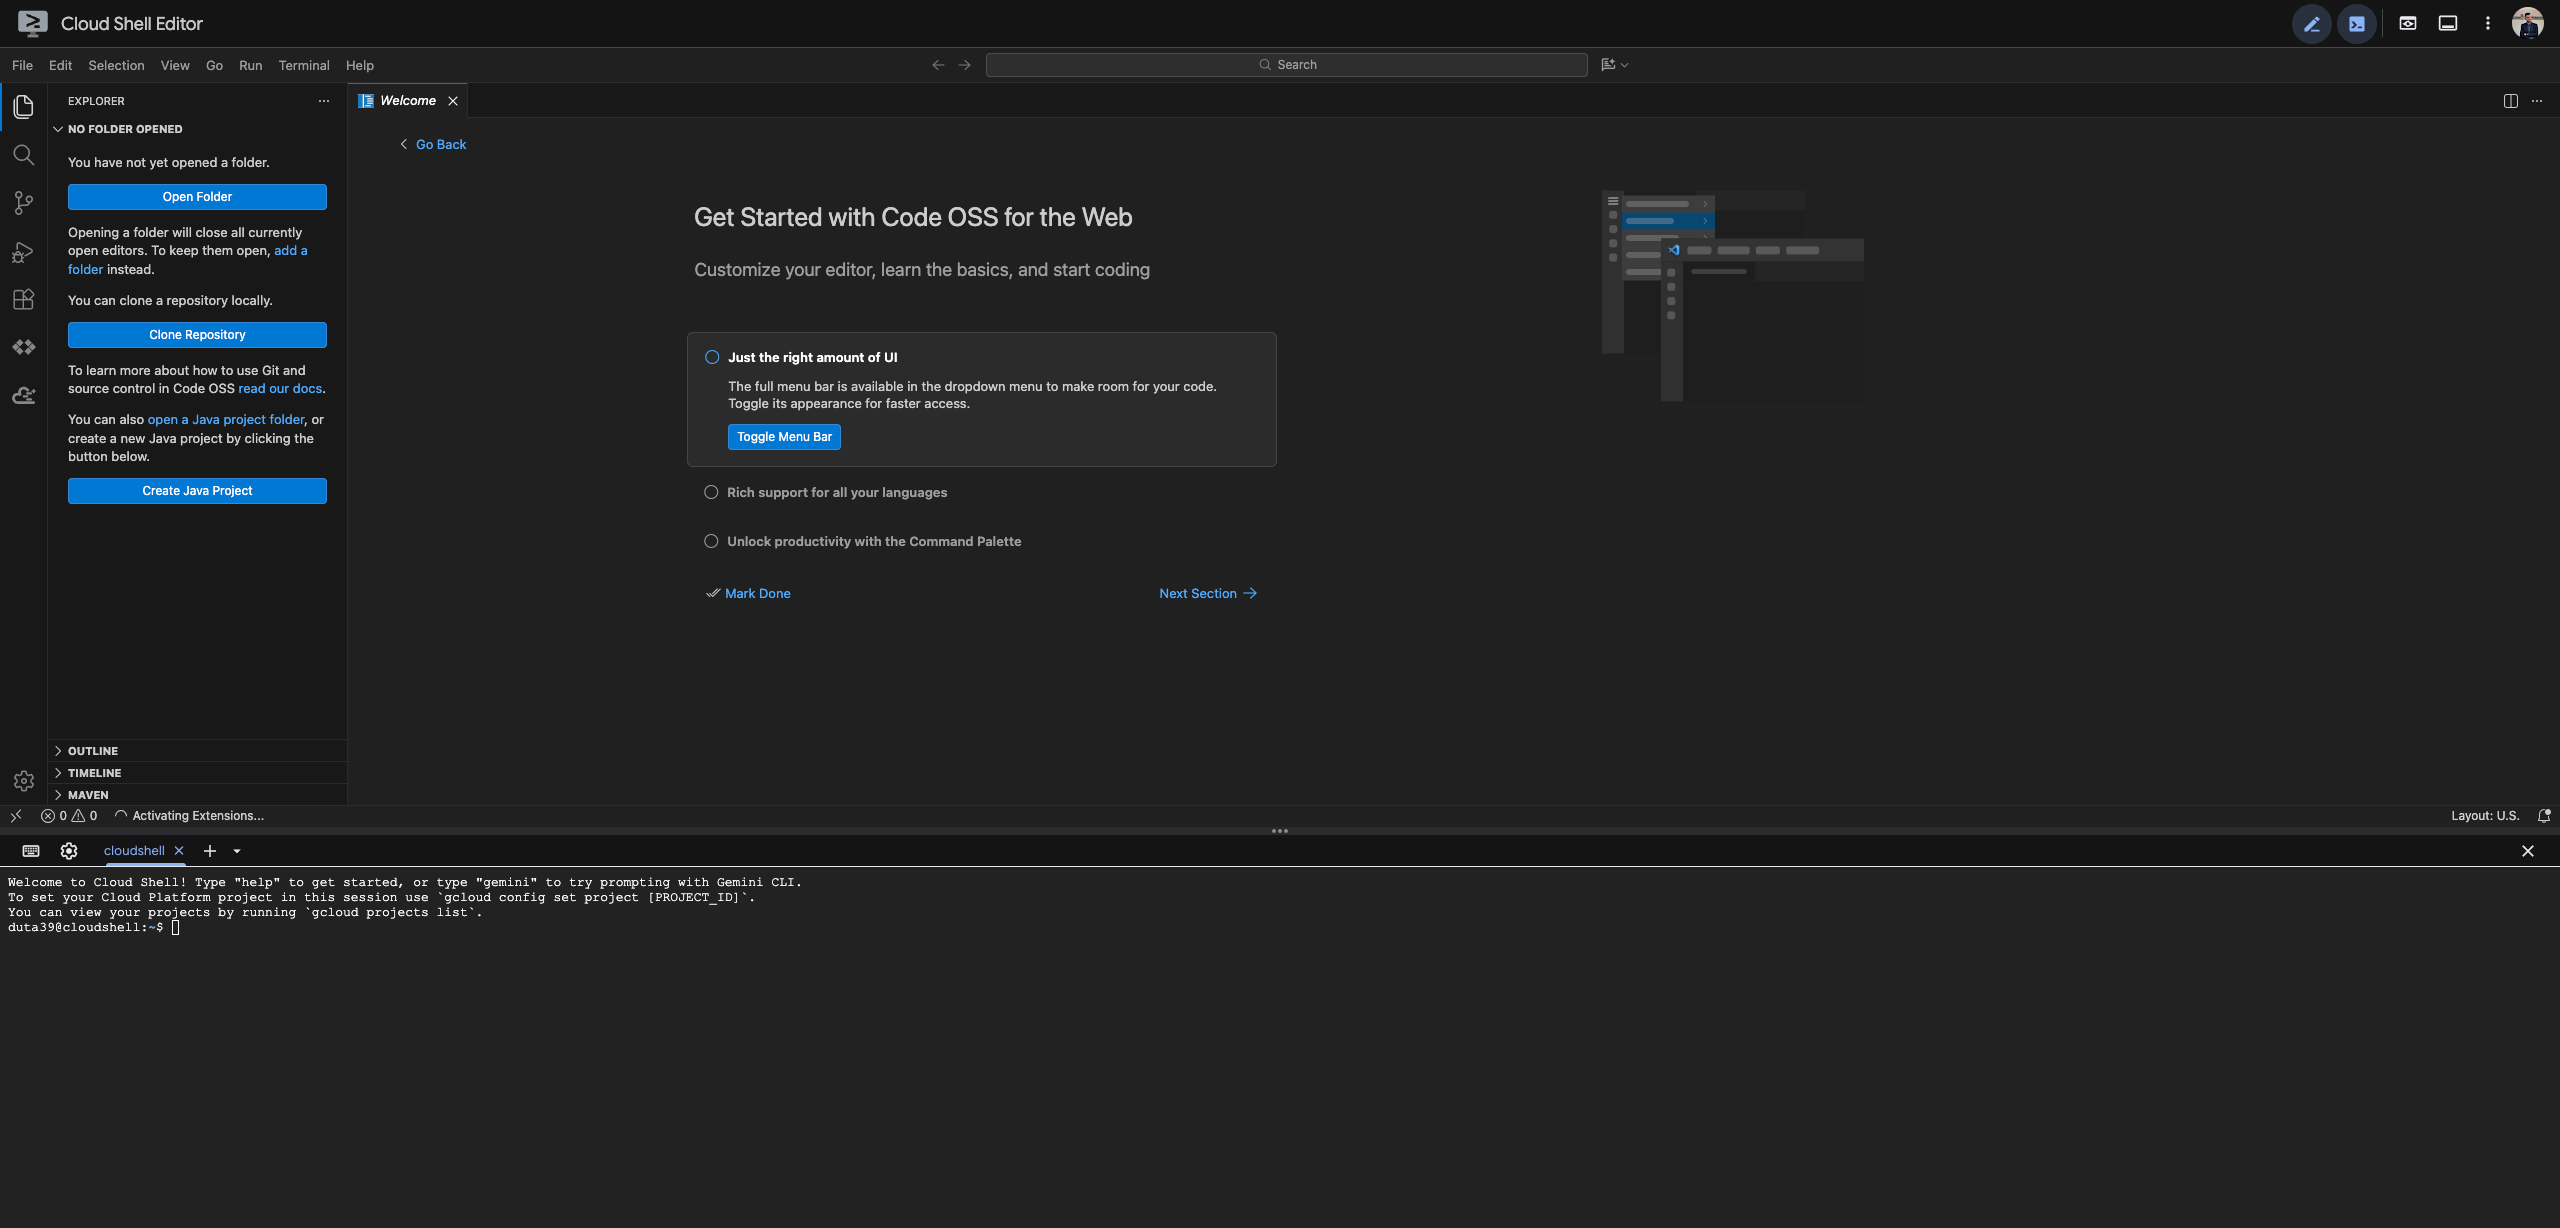
In the terminal, type:
adk help
If you see a list of commands (create, run, web, deploy, eval...) — ADK is already installed, skip to the next step.
If you see "command not found" — install it:
pip install google-adk
Then run adk help again to confirm.
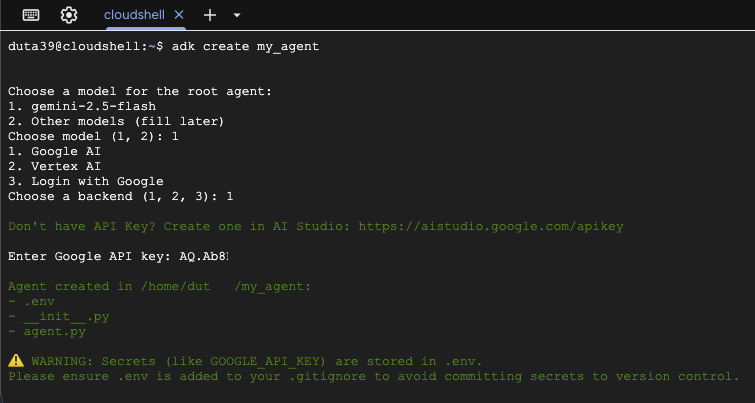
This is the fun part — ADK has a built-in setup wizard that does all the file creation for you. Run:
adk create my_agent
You'll be asked a few questions. Answer them exactly like this:
Choose a model for the root agent:
1. gemini-2.5-flash
2. Other models (fill later)
Choose model (1, 2): 1

1. Google AI
2. Vertex AI
Choose a backend (1, 2): 1

Enter Google API key:
Stop here for a second — you need an API key before you can continue.
- Open a new browser tab, go to aistudio.google.com
- Sign in with a Google account, click Get API key → Create API key
- Copy the key it gives you
Negative : This is free, no credit card involved. You get a generous number of free calls per day — more than enough for today. Don't share your key publicly (e.g. don't paste it into a public GitHub repo).
Paste that key into the terminal where it says Enter Google API key: and press Enter.
ADK will now generate everything for you:
Agent created in /home/.../my_agent:
- .env
- __init__.py
- agent.py
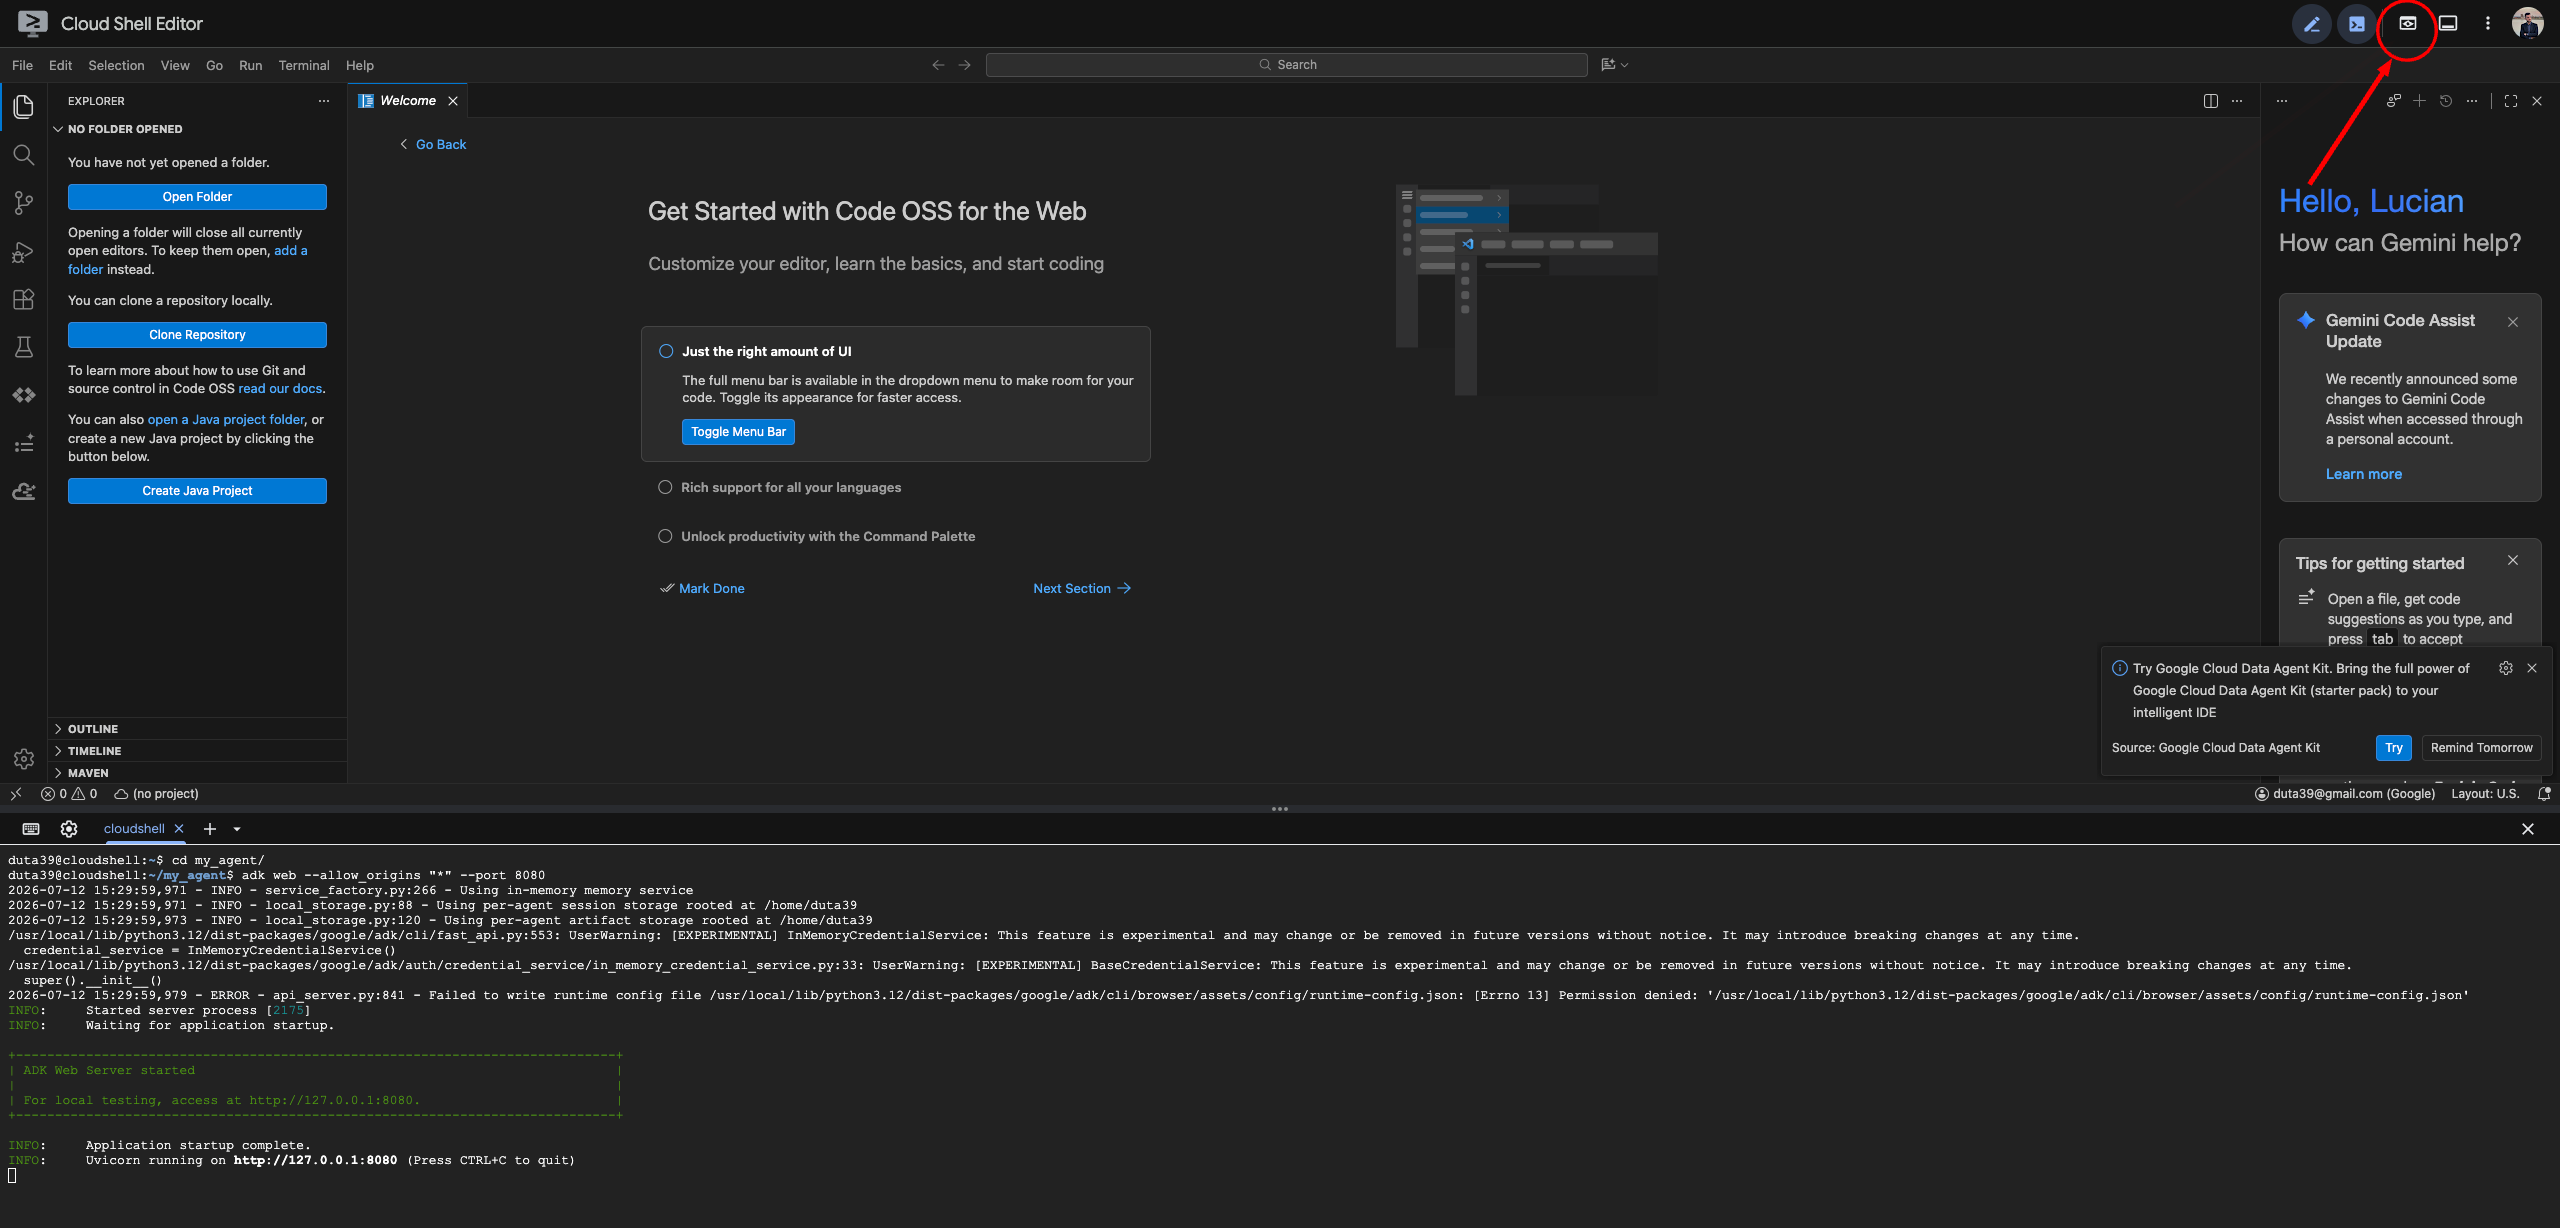
Let's run what was just created, before we change anything.
cd my_agent
adk web --allow_origins "*" --port 8080
Leave this running — don't close the terminal. At the top right of the Cloud Shell window, click the eye icon (Web Preview) → Preview on port 8080.
A new tab opens with your agent's chat interface. 🎉
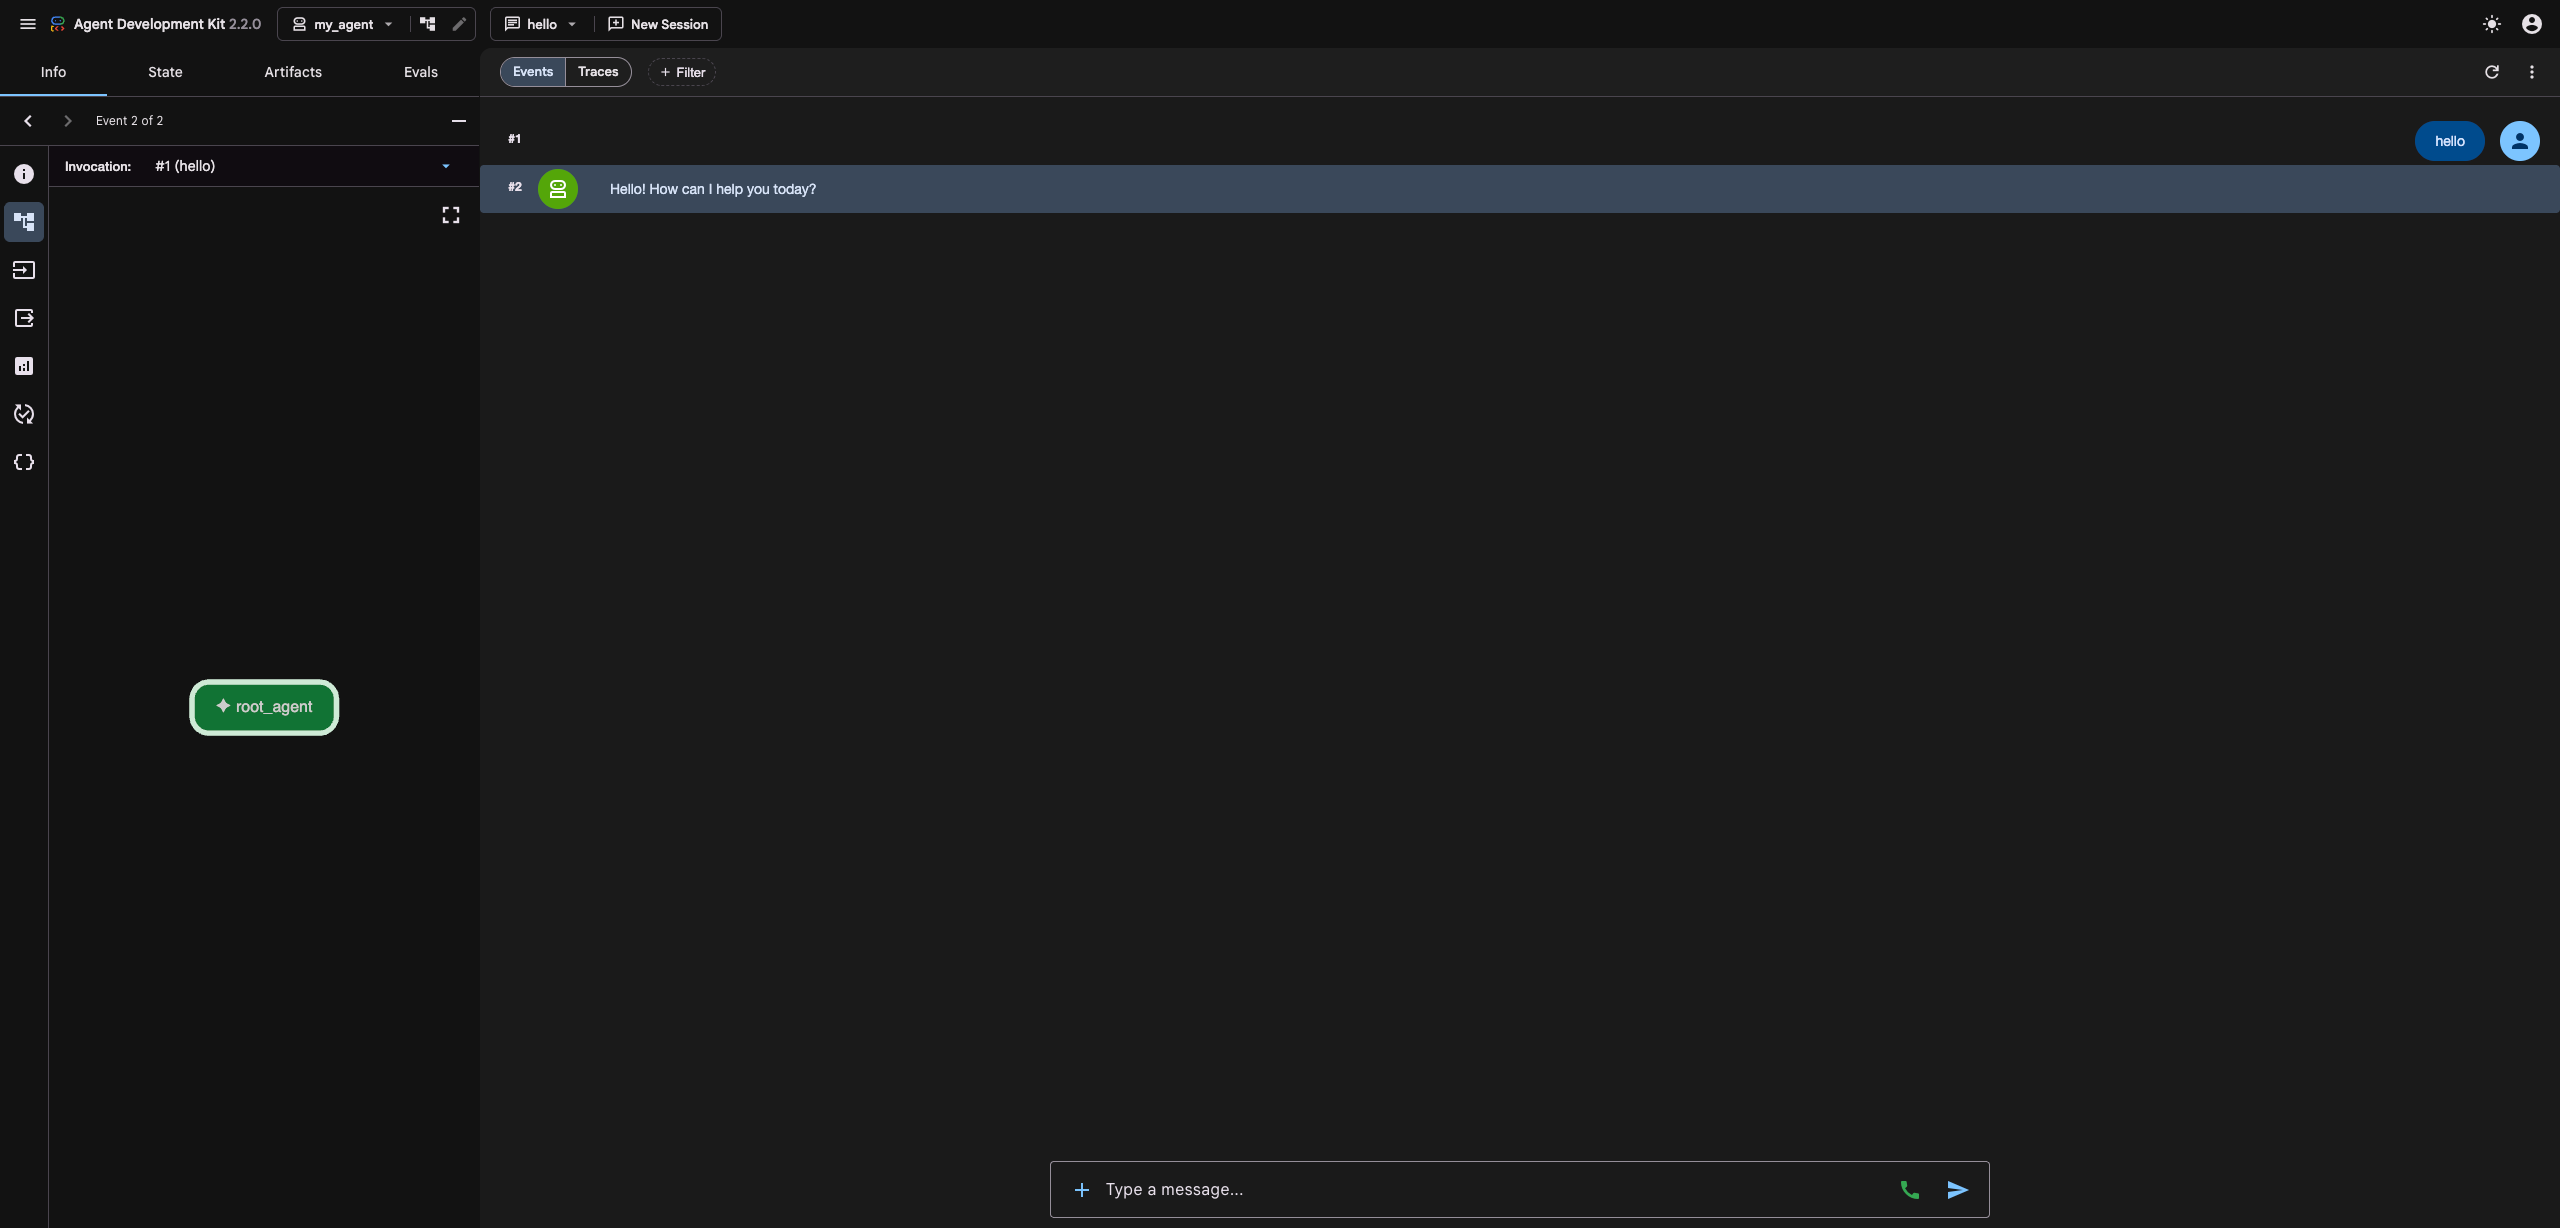
Try asking it something. Then try this:
"Where is the International Space Station right now?"
Notice it either admits it can't check, or makes something up. This is exactly the limit of a chatbot — it only knows what it was trained on, frozen in the past. It has no way to check anything happening right now.
Go back to the file explorer, open agent.py, and replace everything in it with this:
from google.adk.agents import Agent
import requests
import time

def get_iss_location() -> dict:
    """Get the current real-time latitude and longitude of the
    International Space Station, which orbits Earth at ~28,000 km/h.
    """
    headers = {"User-Agent": "UEL-AI-Agent-Demo/1.0"}
    sources = [
        "http://api.open-notify.org/iss-now.json",
        "https://api.wheretheiss.at/v1/satellites/25544",
    ]

    for url in sources:
        for attempt in range(2):
            try:
                response = requests.get(url, headers=headers, timeout=10)
                data = response.json()
                if "iss_position" in data:
                    lat, lon = data["iss_position"]["latitude"], data["iss_position"]["longitude"]
                else:
                    lat, lon = data["latitude"], data["longitude"]
                return {"status": "success", "latitude": lat, "longitude": lon}
            except Exception:
                time.sleep(1)
                continue

    return {"status": "error", "message": "Both ISS sources are temporarily unreachable."}

root_agent = Agent(
    model='gemini-2.5-flash',
    name='my_agent',
    description='A friendly assistant that can track the ISS in real time.',
    instruction="""
You are a friendly, enthusiastic assistant. Keep answers short and warm.

If someone asks where the International Space Station is, or anything about
its current location, ALWAYS use the get_iss_location tool to check —
never guess. Once you have the coordinates, mention them clearly, and note
that this is the ISS's ground track — the point on Earth directly below it,
about 400km down. Add one fun, brief comment about roughly what's below it.
""",
    tools=[get_iss_location],
)
Negative : This version tries two different ISS data sources, with two attempts each, before giving up — so a single slow response from one API doesn't break the whole demo.
Save the file, then restart your agent: click the terminal, press Ctrl+C, then run:
adk web --allow_origins "*" --port 8080
Refresh your Web Preview tab.
Ask the exact same question as before:
"Where is the International Space Station right now?"
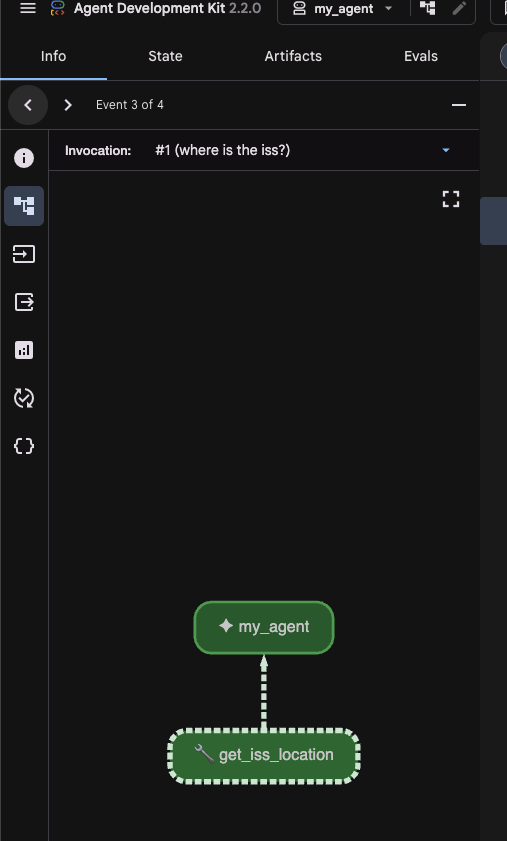
This time, watch what happens. On the left side of the dev UI, click on the response to see the trace — you'll see the agent decide it needs the tool, actually call it, get real coordinates back, and only then answer you.
That decision-making step — deciding to check, checking, then answering — is what makes it an agent instead of a chatbot.
Before you start changing things, here's a quick, plain-English breakdown of every piece in agent.py:
root_agent = Agent(...)— this is your agent. ADK specifically looks for a variable calledroot_agentto know what to run — don't rename this one.model='gemini-2.5-flash'— which AI model powers it. Think of this as the "brain" doing the thinking.name='my_agent'— an internal label, mostly just used in logs and the trace view. Safe to rename for fun.description='...'— a one-line summary of what the agent does. Not something you'll need to touch today.instruction="""..."""— this is the one you'll edit the most. It's the agent's personality and rulebook, written in plain English — not code. This is where you control how it talks, what it prioritises, and exactly when it should reach for a tool instead of just answering.tools=[...]— the list of Python functions the agent is allowed to call. Want it to do more? Write a function, add it here, and mention it in the instruction.
Positive : The instruction field is genuinely just a paragraph of English — there's no special syntax to learn. If you can describe a personality in words, you can write one.
Now it's your turn to make this agent yours. Below are a few more ready-made capabilities. Pick one (or more!) to add, on top of the ISS tracker, or instead of it.
How to add one: paste the function above root_agent, add it to the tools=[...] list (comma-separated), and mention what it does in the instruction text. Save, restart (Ctrl+C then rerun adk web), and test it.
Option A — Who else is in space right now?
def get_people_in_space() -> dict:
    """Get the names and number of people currently in space."""
    headers = {"User-Agent": "UEL-AI-Agent-Demo/1.0"}
    for attempt in range(2):
        try:
            response = requests.get(
                "http://api.open-notify.org/astros.json",
                headers=headers, timeout=10
            )
            data = response.json()
            names = [p["name"] for p in data["people"]]
            return {"status": "success", "count": data["number"], "names": names}
        except Exception:
            time.sleep(1)
            continue
    return {"status": "error", "message": "Couldn't reach the astros API right now."}
Negative : This uses the same requests, headers, and time already imported at the top of the file for the ISS tool — no extra imports needed if you're adding this alongside it.
Option B — Roll the dice / make a decision
import random

def make_a_decision(options: list[str]) -> dict:
    """Randomly pick one option from a list the user gives you."""
    if not options:
        return {"status": "error", "message": "Give me at least one option!"}
    return {"status": "success", "choice": random.choice(options)}
Option C — Days until a date
import datetime

def days_until(target_date: str) -> dict:
    """Calculate how many days remain until a given date.
    target_date must be in format YYYY-MM-DD.
    """
    try:
        target = datetime.date.fromisoformat(target_date)
        days_left = (target - datetime.date.today()).days
        return {"status": "success", "days_left": days_left}
    except ValueError:
        return {"status": "error", "message": "Use format YYYY-MM-DD."}
Option D — Check if code has a syntax error
def check_python_syntax(code: str) -> dict:
    """Check whether a snippet of Python code is syntactically valid."""
    try:
        compile(code, "<student_code>", "exec")
        return {"status": "success", "message": "No syntax errors found."}
    except SyntaxError as e:
        return {"status": "error", "message": f"Syntax error on line {e.lineno}: {e.msg}"}
Now make it yours
- Rename it — change
'my_agent'to something with personality - Rewrite the instruction — sarcastic? overly formal? obsessed with space? go wild
- Combine tools — an agent can have several tools in its
tools=[...]list at once
"403 Forbidden" error when you send a message Make sure you included --allow_origins "*" when running adk web. Stop it (Ctrl+C) and rerun the full command.
Nothing happens / blank preview tab Check the terminal still shows the agent running with no errors. If it stopped, rerun adk web --allow_origins "*" --port 8080.
"ModuleNotFoundError: No module named ‘requests'" or similar Run pip install requests (or pip install google-adk again if that's the missing one).
ISS tool returns an error The Open Notify API occasionally has brief downtime. Try again in a few seconds, or switch to a different toolbox option while it recovers.
- Show a neighbour what your agent does — everyone's should be different by now
- Interested in going further? Speak to us after the session about future UEL Computing Society sessions
- Full ADK documentation: google.github.io/adk-docs Before you go — got 2 minutes? Tell us what you thought: Feedback form
Well done — you just built and ran a real AI agent, from scratch, in a browser. 🚀